KTA’s Certified Coating Inspector Forum Volume 2, Issue No. 7 – July 2023
William Corbett, COO
AMPP Senior Certified Coating Inspector & Certified Protective Coating Specialist
KTA’s Certified Coating Inspector Forum is designed to provide professional development/continuing education on standards, inspection practices, new instruments, and other topics to help keep certified AMPP and FROSIO coating inspectors current. It represents the views of the author and KTA-Tator, Inc. It may or may not represent the views of AMPP: The Association for Materials Protection & Performance, even though SSPC, NACE, and AMPP standards are frequently referenced in the content.
Introduction
Do what, make an incision through a perfectly good coating system to see how thick it is? Why would I do that? Exactly. Why would you do that when coating thickness can be measured nondestructively using traditional Type 1 (magnetic pull-off) gages for coated steel, Type 2 (electronic) gages for coated ferrous and non-ferrous metal surfaces, or ultrasonic gages for measuring coated concrete, wood, and other non-metal surfaces.
The primary reason for measuring coating thickness destructively is to determine the thickness of the individual coating layers after multiple coats have already been applied. Nondestructive gages measure thickness cumulatively. That is, they cannot distinguish layers. While some ultrasonic gages can distinguish the thickness of individual layers, they do not work well on metal surfaces, and there is a limit on the number of coats that they can detect on non-metal surfaces. So, it may be necessary to measure or verify individual layer thickness after the fact using destructive means. Destructive testing of thickness is also valuable for coating failure investigations.
This issue of KTA’s Certified Coating Inspector Forum focuses on destructive coating thickness measurement.
Standards and Instrumentation
The primary standard describing the proper procedures for measuring coating thickness destructively is ASTM D4138, Standard Practices for Measurement of Dry Film Thickness of Protective Coating Systems by Destructive, Cross-Sectioning Means.
This standard practice describes the measurement of dry film thickness of coating films by microscopic observation of precision angular cuts made into the coating film. There are three procedures described in the standard, including:
- Procedure A—Groove cutting instruments,
- Procedure B—Grinding instruments, and
- Procedure C—Drill bit instruments.
Individual coats in a multicoat system (where there is a discernible visual difference between coats, e.g., color) or the overall thickness of a coating system can be measured by these procedures; however, they may not be appropriate for very soft or brittle coatings, or for coatings on soft or ductile substrates. The coating and substrate must be sufficiently rigid to prevent deformation of the coating during the cutting process. Surfaces may be flat or moderately curved.
We will be focusing on groove cutting instruments (Procedure A) since they are the most used type.
There are two primary instruments used for Procedure A: The Tooke Gage (Figure 1) and the Paint Inspection Gauge, or PIG (Figure 2). The Tooke gage is manufactured in the US by Micro-Metrics Company; the PIG instrument is manufactured in the UK by Elcometer, Ltd. Both instruments work similarly, however the conversion scales used for measuring the thickness are different.
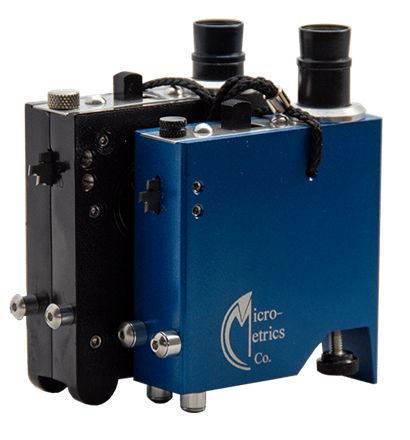
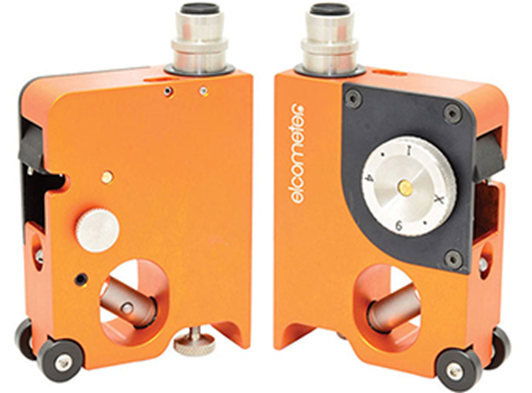
The instruments consist of a gage body and battery compartment, a 50x illuminated ocular containing a scale (reticle), a focus adjustment for the ocular, and three precision tungsten carbide cutting tips (1x, 2x, 10x). Each tip makes an incision at a different angle (45°, 26°, and 5°, respectively). The tip is selected based on the thickness of the coating being measured as described in Step 2 below.
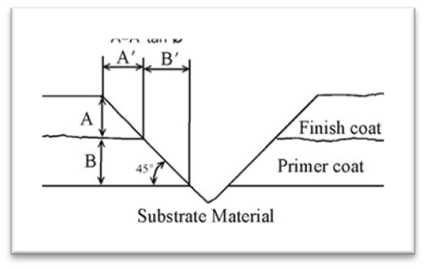
The measuring process is based on simple trigonometry. If the angle of a right triangle is known, and if one leg of the triangle can be measured, the measurement of the other leg can be calculated. This figure shows the cross-section of two coats on a substrate. An incision was made through the two coats into the substrate using the 1x (45°) cutting tip. When viewing the incision through the microscope, the inspector can see and measure A’ and B’, which represent both coats along one leg of the right triangle. Since the cutting angle is known, the measurements of A’ and B’ can be easily converted (using an instrument conversion table) to the measurement of the other leg, where A and B represent the thickness of each coat. In this example, since the angle is 45 degrees, the two legs of the triangle are identical in length, so if A’ measures 2 mils, the thickness of the coating (A) is also 2 mils. If B’ measures 3 mils, the thickness of the coating (B) is 3 mils.
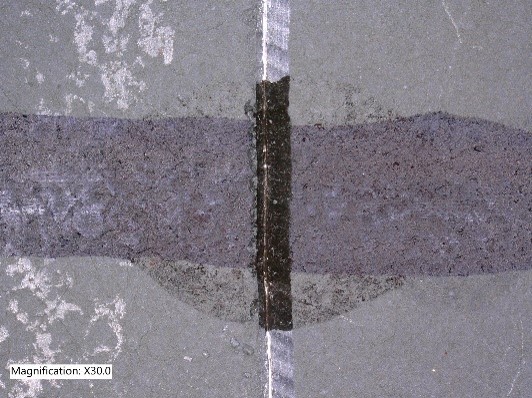
If the coating layers are different or alternating in color, each layer can be seen, and the thickness measured through the ocular using the reticle.
The steps that follow are based on use of the Tooke Gage; the steps may vary somewhat if using the PIG instrument. It is important to follow the instrument manufacturer’s instructions any time you are using an inspection instrument.

There are 10 steps to follow when using the Tooke Gage.
| Step | Operation |
| 1 | Determine the thickness range to be measured |
| 2 | Select a cutting tip |
| 3 | Create a benchmark on the top of the coating |
| 4 | Position the cutting tip |
| 5 | Cut a groove (incision) into the coating film using the cutting tip selected in Step 2 |
| 6 | Locate the groove (incision) through the illuminated, 50x ocular |
| 7 | Rotate the ocular so that the scale divisions of the reticle are parallel with the groove (incision) length |
| 8 | Count and record the number of layers |
| 9 | Count the number of divisions on the reticle that overlay each layer |
| 10 | Convert divisions to mils, micrometers, or millimeters |
Each of these steps is described in greater detail, with an example or image for each.
Step 1: Determine the Thickness Range to be Measured.
Before selecting a cutting tip or blade to make an incision, an estimate of the total coating system thickness range must be known to select the correct cutting tip.
Example: The total coating thickness is approximately 10 to 15 mils.
Step 2: Select a Cutting Tip
The Tooke Gage is supplied with three cutting tips. They are identified as, “1X, 2X or 10X.” The 10X tip is best used to make an incision into a coating film that is 3 mils or less in total thickness. The 2X tip is best used to make an incision into a coating film that is 3–20 mils in total thickness, and the 1X tip is used to make an incision into a coating film that is 20–50 mils in total thickness. Although the 1X tip will cut through a coating much thicker than 50 mils, the maximum thickness is limited due to the focal distance of the ocular. The coating at both the top and bottom of the incision must be in focus at the same time to make an accurate measurement. All three cutting tips are mounted on the side of the Tooke Gage. The tip designation (1, 2 or 10) is stamped next to each tip.
| Cutting Tip | Optimum Coating Thickness Range |
| 10X | 0-3 mils |
| 2X | 3-20 mils |
| 1X | 20-50 mils |
Example: Based on a total coating thickness of approximately 10 to 15 mils, the “2X” cutting tip is selected
Step 3: Create a Benchmark on the Top of the Coating
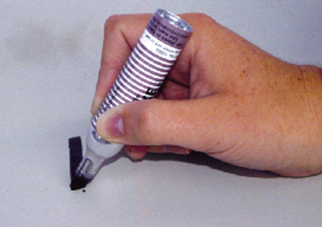
Using a permanent marker, make a horizontal benchmark across the top of the coating film. The benchmark should be 1/8”-1/4” wide and approximately 1” long. If the marker absorbs into coating, a pen or pencil can be used.
Step 4: Position the Cutting Tip
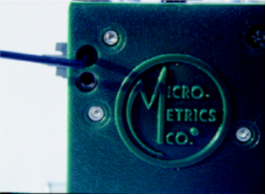
Using the Allen wrench supplied with the gage, loosen the set screws, and slide the selected tip from the gage body until it extends out approximately 5/16”. The remaining two cutting tips should be pushed inward, so they are well below the end of the tip to be used. Tighten all set screws.
Step 5: Cut a Groove (Incision) into the Coating Film
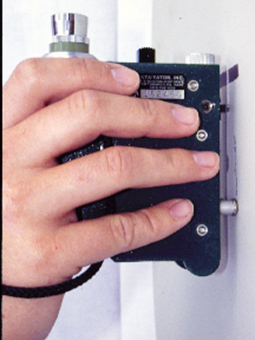
Position the Tooke Gage on its side, so that the extended cutting tip and two guide legs are sitting on the coated surface. Make sure that the cutting tip is resting beyond the horizontal benchmark created on the coated surface in Step 3. Using moderate pressure, pull the Tooke Gage toward you (with the legs leading the cutting tip), carefully dragging the cutting tip perpendicularly through the benchmark to the substrate using a smooth, steady motion. The guide legs and cutting tip must always remain in contact with the coated surface. Do not tilt or rock the gage, otherwise the angle of the cutting tip will be changed. This can be difficult to achieve on rough coating or rough substrates. For example, when used on painted CMU block, the irregularities in the block will cause the gage to rock when making the incision. Although the rocking may be slight, it changes the cutting angle. While the incision may appear to be acceptable when viewing through the ocular, the angle has changed so the measurements will be inaccurate. The total length of the cut should be approximately 1”. Make sure the incision penetrates down to (and even into) the substrate. If not, do not attempt to retrace the cut. Instead, make a new incision but increase the downward pressure on the gage.
Step 6: Locate the Groove (Incision) Through the Ocular Lens
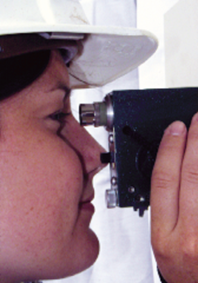
Turn the light on. Position the gage so that the light is reflecting into the incision where it intersects the benchmark. Look through the ocular. Turn the thumb wheel located at the base of the gage beside the light bulb to focus the ocular as needed. The top and bottom of the coating in the incision must be in focus at the same time.
Step 7: Line-up the Scale Divisions Parallel with the Groove (Incision).
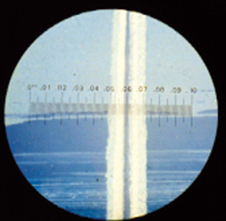
Align the reticle by rotating the eyepiece of the ocular. The divisions on the reticle should be parallel with the incision made with the cutting tip.
Step 8: Count and Record the Number of Coating Layers
Look at the left side (the tapered side) of the cut through the ocular. The right side of the cut was made by the backside of the cutting tip so it can be ignored.
Locate the interface between the substrate and the first layer on the left side of the cut. Count the number of paint layers. Start with the layer next to the substrate (first coat or primer) and continue moving left until you come to the benchmark. Since the benchmark was made on the top surface, there are no more layers. Record the number of layers and the color of each.
Example: Four Layers in the photo shown in Step 9
| Layer No. | Color |
| 1 | Silver |
| 2 | Yellow |
| 3 | Tan |
| 4 | White |
Step 9: Count the Number of Divisions on the Scale that Overlay Each Layer
The reticle contains 100 black lines or divisions. Some of the divisions have a number above them. The only purpose of these numbers is for convenience to separate the scale into groups of 10 divisions each. Count the number of individual lines/divisions that overlay each layer.
Because the thickness of the coating can vary, the number of divisions should be determined by scanning across the length of the incision, and the average and/or range recorded.
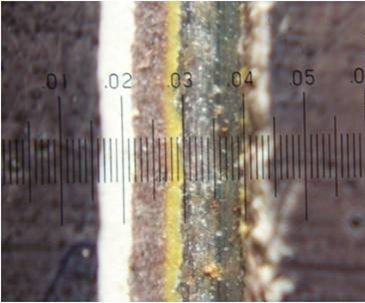
Example, continued: Four Layers
| Layer No. | Color | Average number of Divisions |
| 1 | Silver | 5 |
| 2 | Yellow | 3 |
| 3 | Tan | 6 |
| 4 | White | 6 |
Step 10: Convert Divisions to Mils
To convert divisions to mils, microns, or mm use one of the two conversion tables below based on the type of reticule inside the ocular.
Model OG202 and OG204 (Original Versions) Ocular Reticule; Each scale division equals:
| Tip Designation | 1X | 2X | 10X |
| Mils (0.001”) | 1 | 0.5 | 0.1 |
Newer Dual-Measure Ocular Reticule; Each scale division equals:
| Tip Designation | 1X | 2X | 10X |
| Top Scale (mils) | 1 | 0.5 | 0.1 |
| Bottom Scale (microns) | 20 | 10 | 2 |
| Converted to mm | 0.02 | 0.01 | 0.002 |
Example, continued: Four Layers. Incision was made using the 2X Cutting Tip
| Layer No. | Color | Divisions | Divisions ÷ Cutting Tip | Mils |
| 1 | Silver | 5 | 5 ÷ 2 | 2.5 |
| 2 | Yellow | 3 | 3 ÷ 2 | 1.5 |
| 3 | Tan | 6 | 6 ÷ 2 | 3 |
| 4 | White | 6 | 6 ÷ 2 | 3 |
Six Helpful Hints
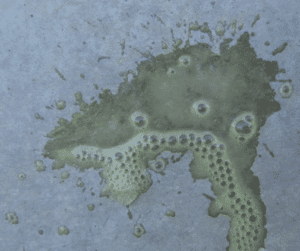
- When making an incision into a coating system containing a zinc-rich primer, the zinc primer and the steel substrate will look very similar through the ocular. To distinguish one from the other, place a 5% solution of copper sulfate onto the incision. The steel will plate out a copper color and the zinc primer will turn black, making them discernable by color difference. (See image below)
- When the surface profile is visible in the incision, make the measurements along a plane at the tops of the peaks since dry film thickness is to be measured above the peaks.
- If the coating tears or chatters when cutting, it may not be suitable for measurement with the groove cutting instruments, but the grinding or drill bit (Procedures B or C in ASTM D4138) might work. Likewise, if the coating or substrate are rough, causing the angle of the groove cutting instruments to vary, the grinding or drill bit procedures might be a viable alternative.
- When used on small diameter pipe, make the incision along the length of the pipe rather than around the circumference.
- If chips of coating can be dislodged by cutting or by impact (e.g., with a slag hammer), the chip can be snapped to obtain a smooth cross-section and the edge examined through the ocular. In this case, each division is equivalent to 1 mil.
- Finally, unlike nondestructive dry film thickness measurement, there is no frequency of measurement discussed in ASTM D4138. The number of replicate measurements and number of locations should be discussed amongst interested parties prior to the inspection, and the test areas touched up.
Summary
This edition of the Certified Coating Inspector Forum has focused on destructive coating thickness measurement using a Tooke gage (or similar device) according to Procedure A in ASTM D4138. Always follow the manufacturer’s instructions for the use of the instrument and check with the facility/asset owner prior to conducting any type of destructive testing, including how many measurements that will be taken. And since the test damages the coating, repair procedures should also be discussed and approved in advance.



Thank you for the Let’s Talk About Measuring Coating Thickness Destructively that is very informative
As you pointed out following the manufacturer’s instructions for the use of the instrument and checking with the facility owner prior to conducting any type of destructive testing is necessary