When a large-scale bridge is in need of significant reconstruction, many factors should be considered prior to initiation of the project.
Part of this particular reconstruction involved repainting of the structural steel on a 40-foot-wide lift bridge that had a total length (including approaches) of 2,877 feet, with a main span of 418 feet. The coating system selected consisted of four coats: a zinc primer coat, a tie-coat, one coat of epoxy and an acrylic polysiloxane topcoat with high gloss.
The coating system was applied during the winter, spring and summer of 2008. Sometime after the topcoat was applied to the bridge, staining was noticed in numerous areas. These stains appeared as spots and streaks and were observed on various locations of the bridge, but the most concentrated areas were on the north side. The owner, through a recommendation of the prime engineer, contracted an independent, third-party consultant to investigate the staining problem and determine the cause in order to prepare for further rehabilitation.
FIELD INVESTIGATION
The consultant, accompanied by a representative of the engineer and various other project personnel, visited the lift bridge in July of 2010. Access to the deck support steel was gained from existing staging. The truss steel was accessed from the sidewalk. The results of the investigation are summarized as follows.
The structural steel on the bridge was painted a burgundy-red color. In general, the coating was in good condition with minimal corrosion, paint peeling or other objectionable properties.

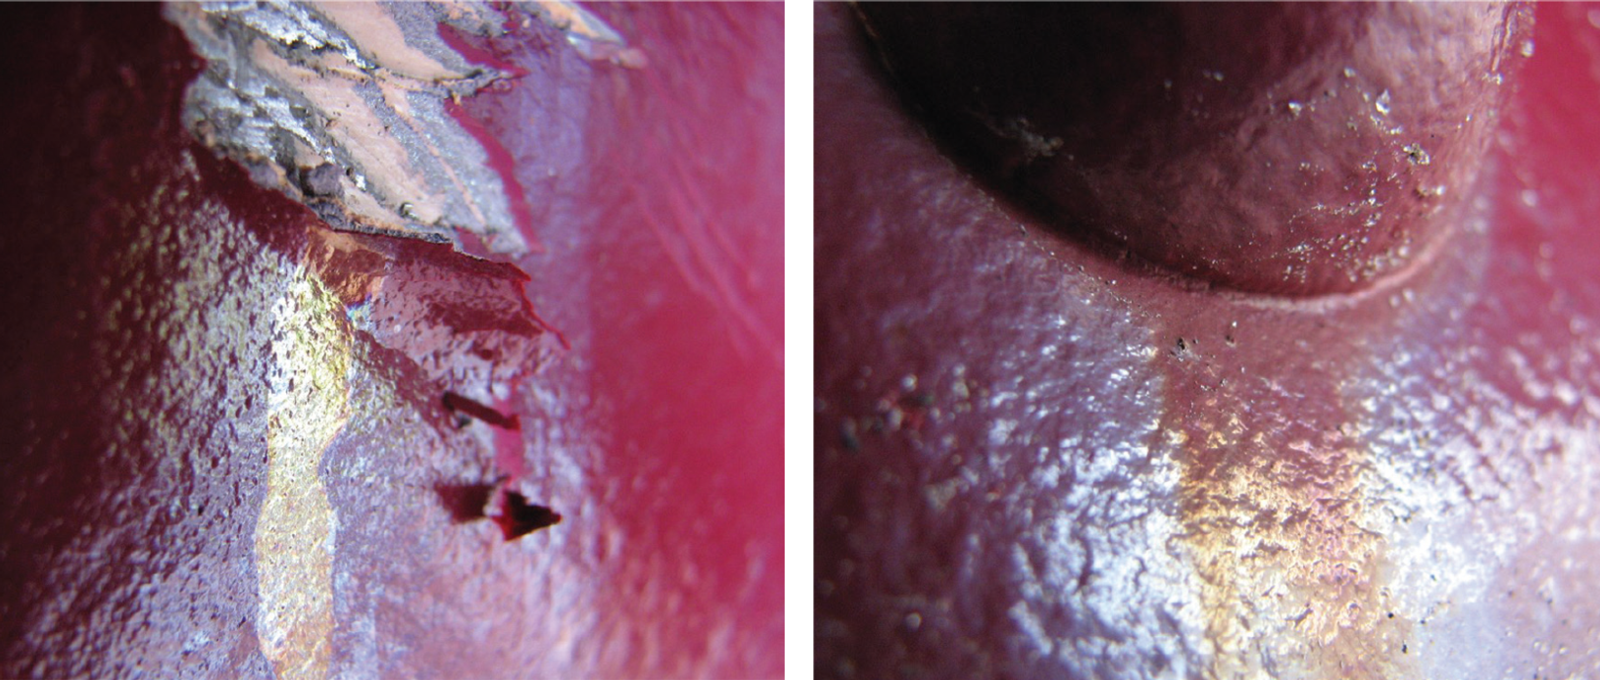
There was noticeable staining on the bridge finish coat in many areas. The first area examined was on the truss steel on the west side of the bridge. There were noticeable spots in many areas, and these spots had an iridescent appearance. Upon close examination, it was found that most of the spots had a visible piece of contamination at the center of the spot (Fig. 1). In some cases, the contamination was embedded in the paint, with the very top of the contamination exposed. In other cases, the contamination was embedded in the top layer of the paint and could be removed with a fingernail.
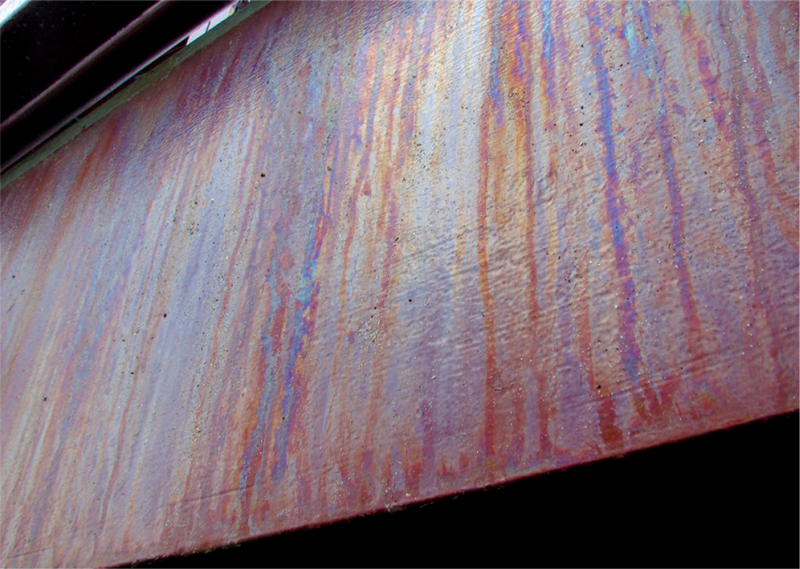
In some areas, staining appeared in a streaky pattern. The streaks were consistently aligned in a vertical pattern and had the same iridescent sheen as the spots. In some cases, the streaks originated on the top of box chords and other structural steel members close to the edge of riveted lattice pieces. Typical of lattice bridge members, the edges had a gap in the coating between the chord and the riveted lattice piece. The stains also consistently appeared on or directly below rivets. In many areas on the north side, staining was visible on virtually every rivet, although the degree of staining varied considerably from rivet to rivet.
On the lift towers, several squares of coating were missing where metal pieces were reported to have been mechanically removed. Long iridescent stains and streaks were clearly visible starting at the bare steel area and extending vertically downward (Fig. 2). The bare steel areas were rusted.
.png)
In one area near the middle of the bridge, a piece of rust scale that had been overcoated was visible on the bottom of a beam flange. The coating was cracked on the upper left side of the piece of scale. Iridescent staining started at the crack in the paint and continued vertically downward.
The staining was clearly more concentrated on the north side of the bridge (Figs. 3 and 4). The most severe area was on a section of fascia directly beneath and bordering the road deck, where the staining covered up to 50 percent of the surface. In other areas, staining was less severe but clearly visible. In the middle and on the south side of the bridge, staining was visible, but only as small spots or vertical streaks.


On several areas on the north side of the bridge, the topcoat appeared to have been touched up. Reportedly, the touch-up work had been performed during the week prior to the site visit. The touch-up paint was in good condition, free of visible staining and appeared to adhere well to the previously applied topcoat. No delamination was visible.
LABORATORY ANALYSIS AND DISCUSSION
The field investigation and the laboratory analysis indicated that the staining on the surface of the acrylic polysiloxane topcoat on the bridge was the result of rust bleeding from various areas. Water runoff that results during periods of rain carried iron oxide from small areas of the bridge where the steel was exposed and deposited the iron oxide on the surface of the topcoat. The iron oxide thus created the iridescent-like staining that had been observed visually.
During the laboratory analysis, samples of the topcoat that were discolored with the iridescent stain were analyzed using scanning electron microscopy-energy dispersive spectroscopy (SEM-EDS). The stained samples were then compared to a sample that was removed from an area where no staining was evident. The examination of the stained samples revealed that the composition of the staining was primarily iron (likely as an iron oxide). The analysis did not identify any other elements on the unstained coating. The results of the analysis indicate that the stain was primarily composed of iron compounds.

The visual examination of the bridge also pointed to rust bleed as the main cause of the staining. Streaking typically occurred in areas where rust bleed emanated from crevices. Some of the most concentrated areas were apparent on the north face beneath the deck, where rust streaking originated from the gap between the steel and the concrete deck. Other areas of severe staining occurred directly below locations where lattice work was connected to the beams with rivets. This configuration creates several areas where steel surfaces could mate and form a back-to-back connection. These areas are difficult to seal with paint, and ultimately water enters. When water enters these areas, the steel corrodes and the corrosion products are carried away with the water (i.e., rust bleed), eventually depositing on the surface of the coating.
Further evidence that rust was the primary cause of the staining was found on the lift towers. As noted previously, there were several areas of uncoated and rusted bare steel. In these areas, long streaks of the iridescent staining were visible below the bare rusted area. Additionally, on an area on the top of the floor beam, similar staining was coming from a crack in the coating around a piece of rust scale that had not been removed.
The iridescent appearance of rust staining is not uncommon following accelerated testing of coatings on steel panels. Often, when rust spots appear on steel panels during the testing, iridescent staining is visible around and below the rust spots.
The stains on this lift bridge may have been more visible than usual because of the finish color and the gloss of the applied topcoat. The iron oxide deposits on the surface scattered light and made the surface appear to be lighter in color and lower in gloss. This sharply contrasted with the glossy burgundy-colored topcoat and made the stains more visible.
It was the consultant’s opinion that the staining was merely an aesthetic problem that would not affect the performance of the coating. There was no indication that the deposit was degrading the topcoat or any other coat. Unfortunately, it appeared that the stains were very difficult to remove. Attempts to remove the stains with a wet cloth were made during the field visit, but this proved unsuccessful. Because the materials were well-adhered and could not be easily removed, the easiest way to hide the staining was to apply an additional coat of the burgundy-colored topcoat.
To avoid similar issues on future projects, attempts should also be made to apply additional coatings around rivets in order to reduce the amount of rust bleeding. Also, it may be advisable to apply a penetrating sealer (i.e., an epoxy penetrating sealer) around the back-to-back connections where rust bleed originates from crevices. The penetrating sealer will wick into and seal the crevice, helping to reduce rust bleed from those areas.
Regardless of the repair attempt procedure, it was unlikely that the staining on this particular lift bridge could be completely prevented because of the presence of ongoing corrosion in the crevice areas between lattice bars and around rivets. Crevice corrosion is a design issue common to virtually all bridge structures, particularly older structures with lattice bar construction. Industry experience has shown that even the best methods of remediation, such as penetrating sealers and caulking, are temporary, bandage-like measures that only minimize rust bleed.
ABOUT THE AUTHOR
.jpg) Cynthia O’Malley is the vice president and group manager of the professional services business unit at KTA-Tator, Inc., and co-chair of SSPC’s Women in Coatings Program. During her more than 20 years with KTA, she has been active in several industry organizations. O’Malley is an SSPC-certified Protective Coatings Specialist, a member of ASTM International and past-president of the Pittsburgh Society for Coatings Technology (PSCT). Her industry honors include the SSPC’s 2013 Presidents’ Lecture Series Award and the 2015 Women in Coatings Impact Award.
Cynthia O’Malley is the vice president and group manager of the professional services business unit at KTA-Tator, Inc., and co-chair of SSPC’s Women in Coatings Program. During her more than 20 years with KTA, she has been active in several industry organizations. O’Malley is an SSPC-certified Protective Coatings Specialist, a member of ASTM International and past-president of the Pittsburgh Society for Coatings Technology (PSCT). Her industry honors include the SSPC’s 2013 Presidents’ Lecture Series Award and the 2015 Women in Coatings Impact Award.

