During any crime scene investigation, there is the collection of samples (evidence) that are subsequently analyzed in a forensic laboratory and used to help solve the crime. This process is very similar (albeit a lot less serious) when a coating fails prematurely. Samples of failing and non-failing coating are gathered as evidence, along with a variety of other samples depending on the nature of the coating failure. But proper sample extraction is key. Without solid evidence that is well documented, it’s hard to solve the mystery, and difficult to get that evidence to stand up to the scrutiny of litigation if it goes that far. This brief articles addresses the types of paint samples that are required, methods for removal as well as a description of the other samples that are often collected for paint failure analyses.
The most common sample required to perform a coating failure investigation is the applied coating itself. Samples of the failing coating system need to be collected as well as samples of the same coating system in non-failing areas (if they exist). These two types of samples are needed to look for differences (thickness, coating type, etc.) between the two types of samples. Of course, it is always wise to sample the coating in places where other destructive tests (e.g., adhesion tests or destructive thickness measurements) have been performed to minimize damage to the existing coating/structure.
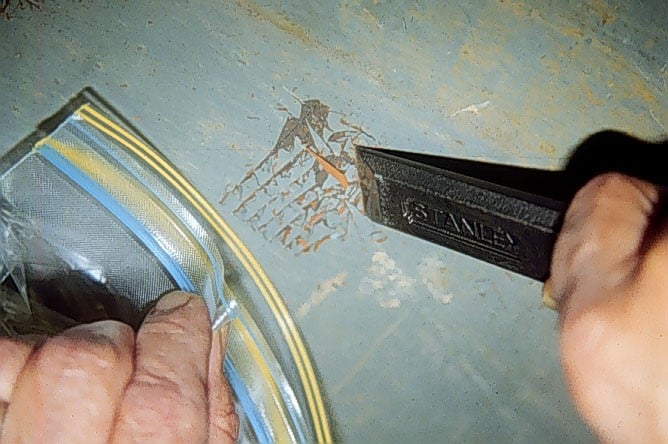 When poor coating adhesion is the source of the failure, sampling of the failing coating materials can be accomplished simply by picking the paint off the substrate with one’s fingers. In other cases, however, paint sampling is more difficult, and a hammer and sharp wood chisel may be required to remove the existing coatings. This is particularly true when harder, tougher, thick coating systems (e.g., epoxies, elastomeric urethanes, etc.) need to be sampled. Thinner coating systems (often applied to blast cleaned steel) that are tightly adhered can often be sampled by cutting a cross-cut pattern into the coating and then using a sharp knife or chisel to “ribbon” the coating off the surface.
Sampling is easy to accomplish on horizontal surfaces. The coating is simply disbonded and then collected. However, sampling on vertical surface can be difficult when the coating is well-adhered. In this case the best way to sample is to tape the sample bag directly beneath the area to be sampled. The bag should be held open with one hand while forcible disbonding the coating with another hand.
When separation occurs between two coats of paint, it is important to also sample the underlying coating system, which may be well-adhered. Information on the underlying coating system is needed to assist in determining where the failure is occurring; for example, perhaps the plane of fracture is occurring deeper into the coating system and not between the two most recent applications. A sample of the underlying coating system is also useful in determining whether the failure is a result of an incompatibility between two types of coatings, or whether there was some type of bond breaker present on the surface preventing adhesion of the two coating layers.
Once sampled, the coating should be placed in plastic bags and labeled. Typically, food grade plastic bags (Baggies) are acceptable. While some individuals opine that plasticizers or other chemicals can leach out of the bags and contaminate the paint samples, this is not true. These types of bags are made to store food for human consumption and are formulated specifically not to release chemical constituents into the contents of the bags. Each sample should be numbered sequentially and the location and description of the sample recorded.
When the failure is suspected to be a result of solvent entrapment, the samples should be placed in a septum capped glass vial. The vial is heated in the laboratory and then the air (head) space is sampled to identify the presence of residual solvents, including their identity.
But applied coating samples are not the only coatings that are needed to perform a failure investigation. Liquid control samples are often needed and may need to be requested from the coating manufacturer. These samples are needed to determine (1) whether the applied coating is the specified coating and (2) whether the coating was proportioned (mixed) properly, especially if the product was multi-component.
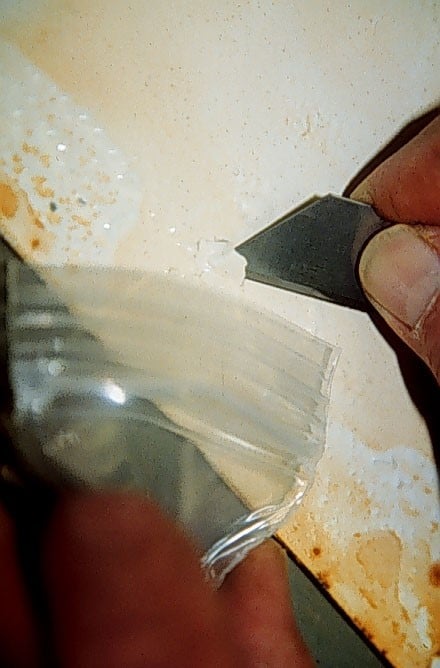 When blisters are present, the backs of the blister caps should always be collected. These are used to determine the presence of any contaminants that are on the back of the caps. These samples are essential in determining the presence of ions, since blisters often form as the result of the presence of ions on the substrate.
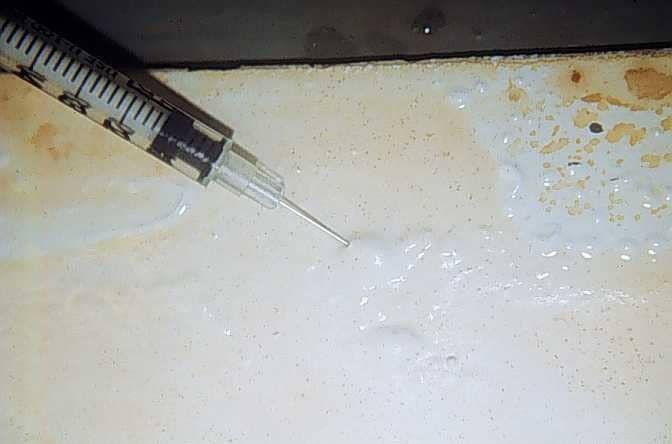
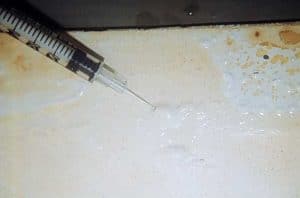
Sampling of blister fluid is also important when present (some blisters do not contain liquid). This is best accomplished by inserting the needle of a syringe into the top side of the blister cap and sucking the fluid out by pulling back on the plunger. If there is a concern that ions are present, or that pH is a potential cause of the failure, then the sample of blister liquid can be dispensed into a small glass vial. If there is a possibility of the presence of solvent, then the blister fluid should be inserted into a vial with a septum cap. As with the coating samples, the vial is warmed in the laboratory and the head space is sampled and analyzed.
If the coating is failing due to some type of unusual exposure (chemical storage tank contents, unusual conditions in a sewage treatment plant, etc.), it is wise to request a sample of the tank contents, when feasible. The chemical analysis of the tank contents can be compared to the analysis of the blister fluid for common characteristics.
 Finally, in some cases samples of the substrate itself are required. Typically, sampling of steel is not necessary, however, when the coating failures occur on stucco, concrete, plaster, gypsum board or wood, substrate analysis can be useful in helping to diagnose the coating failure. There are a variety of problems with the concrete itself that can cause coatings to fail, including reactive aggregate (alkali – silica reaction), the presence of form release agents and densifiers, heavily troweled concrete and moisture. Cores of the concrete are removed and petrographically analyzed to determine the any potential role of the concrete in the failure.
Stucco and plaster samples can often be removed by using a chisel to extract a small square of the stucco. In some cases, however larger square samples are removed with a saw for petrographic analysis and to determine the pH of the stucco.
Samples of gypsum board containing failing paint can often be removed by cutting a square about two square feet with a utility knife and then using a chisel to lift the sample, creating a separation below the gypsum board paper. Samples of this type and size will enable the analysis of the joint compound, since paint failures on gypsum board frequently occur within the joint compound layer.

