Introduction
Most industrial and marine protective coatings rely on a mechanical bond to the substrate to remain attached while in service. This bond is generally provided by a surface profile or anchor pattern that is imparted into the surface prior to application of the coating system and effectively increases the surface area of the substrate (e.g., steel). A surface profile is typically generated by abrasive blast cleaning; although some types of rotary impact-type power tools can also create a surface texture. Without this mechanical “tooth” the coating system may become detached as the substrate and coating system expand and contract (e.g., due to temperature fluctuations and/or service loading/unloading) while in service, Coating specifications frequently invoke a minimum and maximum surface profile depth (e.g., 2-4 mils), but rarely invoke a minimum peak count or peak density.
The Significance of Peak Density
While surface profile depth is important, the number of peaks per unit area is also a significant factor that can improve long term coating system performance. According to a study conducted in the early 2000’s[1] a high peak count characteristic of surface profile helps resist undercutting corrosion when the coating system becomes damaged while in service, and provides the coating system with better adhesion to the prepared substrate. More recent research conducted by the DeFelsko Corporation[2] confirmed that a greater peak density (pd) promotes coating system adhesion. So, while there is typically a maximum peak height invoked by a specification (to prevent pinpoint rusting resulting from unprotected rogue peaks), there is little concern over too many peaks. The more peaks there are within a given area, the greater the surface area; the greater the surface area, the better the adhesion. Note that this is the primary reason why thermal spray coatings (metallizing) cannot be applied to steel surfaces prepared with steel shot. While the surface profile depth may be adequate (i.e., 3-4 mils), the peak density of a peened surface will not provide the necessary surface area for proper adhesion, and disbonding will likely occur.
Peak Density Verses Peak Count
Peak density and peak count are similar, but slightly different in how they are reported. According to ASTM, relative peak count or rpc is defined as, “the number of peak/valley pairs, per unit of length, extending outside a “deadband” centered on the mean line,” and is typically reported in peaks/cm. Peak density (pd) is the number of peaks present within a given surface area, and is typically reported in peaks/mm2.
Governing Industry Standards
Surface profile or anchor pattern is quantified/semi-quantified according to one of the three methods described (comparator, depth micrometer, replica tape) in ASTM D4417, Standard Test Methods for Field Measurement of Surface Profile of Blast Cleaned Steel, and peak count is quantified according to the method described in ASTM D7127, Standard Test Method for Measurement of Surface Roughness of Abrasive Blast Cleaned Metal Surfaces Using a Portable Stylus Instrument. The frequency and acceptability of the acquired measurements is described in SSPC-PA 17, Procedure for Determining Conformance to Steel Profile/Surface Roughness/Peak Count Requirements.
Quantifying Peak Count and Peak Density
Peak count is quantified using a portable stylus-type instrument. According to ASTM D7127, the apparatus consists of a portable skidded or non-skidded electronic surface roughness measurement instrument capable of measuring Rpc in compliance with ASME B46.1. The apparatus should have a vertical range of at least 300 μm and permit a sampling length of 2.5 mm and an evaluation length of 12.5 mm. The apparatus should include a stylus with a tip radius of 5 μm, and permit recording of Rpc up to 180/cm. Surface deviations are sensed by the stylus and converted to electrical signals within the device. Internal processing converts these signals into standard surface characterization parameters, which are then displayed or printed. ASTM D7127 recommends obtaining a minimum of five (5) traces per area to characterize the surface. Many of the stylus-type instruments that will measure peak count were designed for manufacturing and/or the machine finishing industry rather than for field use. When used in the field, extreme care is necessary as the tip of the stylus can easily be damaged.
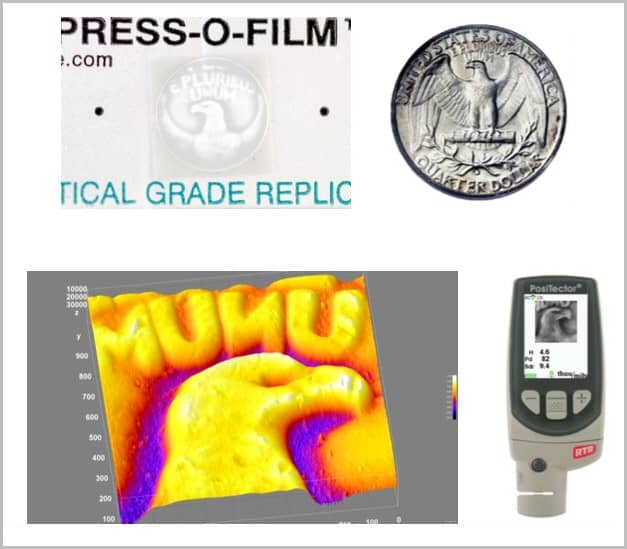
Peak density can be quantified using replica tape; however, this procedure requires the use of a slightly different version of the tape (called Optical Grade) than is traditionally used to measure surface profile depth per ASTM D4417, Method C (Coarse, X-Coarse and X-Coarse Plus). While the burnishing procedures are the same, the type of tape and the way that the tape is read differs. Both peak height and peak density are measured and reported using the Optical Grade replica tape and a Replica Tape Reader (RTR). ASTM recommends obtaining two measurements per area to characterize the surface.
Use of Optical Grade Replica Tape to Determine Peak Density


Since peak density can now be readily measured in the field (and measured simultaneously with peak height using the same replica tape), it is likely that specifications will start requiring measurements of peak density, especially for materials such as metallizing that rely on mechanical bonding. Not so fast… simply requiring the measurement of peak density will accomplish little without establishing a minimum acceptance criteria, just as specifying the measurement of coating thickness without an acceptable range is of little value. The minimum required peak density for proper bonding of the coating system will need to be established, and will likely vary depending on the coating system. In addition, the steps required to increase peak density without adversely affecting peak height will also need to be investigated.
[1] The Effect of Peak Count of Surface Roughness on Coating Performance; Hugh J. Roper, Raymond E.F. Weaver, Joseph H. Brandon; Journal of Protective Coatings & Linings, Volume 21, No. 6; June 2005
[2] Replica Tape – Unlocking Hidden Information; David Beamish; Journal of Protective Coatings & Linings, Volume 31, No. 7; July 2015


