An ounce of inspection may be worth a pound of do-over.Cleaning and painting commercial buildings comes with extensive challenges. The paint does not always perform as expected. In some cases, poor performance is caused by problems with the building itself. In others, it is caused by a failure to comply with the specification and coating manufacturer’s requirements during building repairs, cleaning and painting. In addition to surface preparation and coating application, the contractor may be responsible for assuring that additional work like tuckpointing is being performed, blocks are repaired and sealants and control joints are replaced. The quality of the associated work affects the performance of the paint as well as the entire building envelope. Unfortunately, painting and anything associated with it are often seen as incidental compared to work like re-roofing. Because of that perception, little inspection is performed other than a final walk-down. As we’ll demonstrate, deficiencies can readily escape detection if a final visual assessment is the only inspection. At a minimum, the construction sequence should integrate spot inspections of each phase of cleaning, painting and paint-related work, in order to realize the long-term benefits a quality installation has on the building envelope. This article identifies some of the building repair, cleaning and painting inspections and tests that can be conducted on a spot basis by the owner, architect, general contractor or manufacturer to identify deficiencies while the work is in process so that repairs can be made before the flaws are covered up. The inspections should include an examination of the quality of block/mortar repairs, installation of sealants, the degree of surface preparation achieved for painting, and moisture content of the walls before any coating is applied. The inspector should examine the quality of coating application for proper thickness and continuity and ensure that ambient conditions are appropriate for application and drying. He should examine the finished product for coverage and aesthetics. Test PatchesThe initial site visit should coincide with test patch work to clearly establish the expected quality of surface cleaning and paint removal, the surface texture or scoring of the substrate allowed, the extent of de-glossing required and expectations regarding final appearance, such as the number of pinholes allowed per unit area, if any. Test patches should also be used for building-related repairs such as tuckpointing and masonry patching. The test patches serve as a visual and tactile representation of the specification requirements so that all parties clearly recognize the expectations and can resolve differences before production work begins. Many disputes with the acceptance of building repairs, cleaning and painting witnessed by the authors could have been avoided if the work had started with the installation and acceptance of test patches. Block and Mortar RepairThe condition of the block and mortar after surface preparation needs to be inspected, ideally when the cleaning first begins. Mortar joints should be examined to determine if tuckpointing is needed (photo 1). The mortar may have been soft before surface preparation began, or the cleaning itself may have created problems, especially if the existing coating was removed by abrasive blast cleaning. If the cracking is not extensive and relatively stable in width, mortar joints can be repaired by tuckpointing, which involves the removal of loose and deteriorated mortar until sound mortar is achieved followed by the installation of new mortar to the area. Note that National Concrete and Masonry Association (NCMA) TEK note 8-1A uses the terms tuckpointing and repointing interchangeably.
Extensive cracking and cracks that exist within the masonry unit are signs of a greater problem such as foundation settlement or excessive control joint spacing. If the inspector detects extensive cracking during a spot inspection, a structural engineer may need to examine the building. Otherwise, after cracks are repaired and painted, the magnitude may go unrecognized and a structural examination never considered. While an inspection of mortar joints should be done before paint is applied, many deficiencies will still be visible after the fact, so the mortar joints should be included in each spot inspection (photo 2). Unfortunately, if repairs are needed, the coating must be removed, followed by repainting the joint after repairs are made.
The inspector should also examine joints for exposed reinforcing wire (photo 3). If exposed wire is present, tuckpointing is required prior to painting. Even a small amount of exposed wire will rust beneath the new coating.
The inspector should confirm that the mortar used for tuckpointing is compatible with the existing mortar and matches it in strength, type and color. For example, if a cement-based mortar is used on a building with lime mortar, it can result in cracking of adjacent masonry. If the existing mortar mix design is unknown, a petrographic analysis may be required to match the mortar strength and type. Proper execution of tuckpointing should also be confirmed. Generally, joints are tuckpointed in two lifts at a minimum of a quarter-inch for each lift. Proper mortar thickness is important, and feathering must be avoided. If feathered, the mortar will fracture from the existing mortar. If blocks or block faces are replaced (photo 4), the inspector needs to examine the quality of the installation before painting. Once the paint is applied, the repairs will be difficult to locate for inspection.
If holes in block are repaired, the quality of the repair needs to be examined before painting.Photo 5 illustrates deficiencies that were apparent shortly after a mortar patch was installed. The patch was beginning to crack and was loose, as determined by tap testing. Such deficiencies would have been difficult to locate once a coating system had been applied.
If fine cracks in mortar or block must be sealed (photo 6), the inspector should confirm that the sealant is suitable for the size of cracks being repaired, possesses adequate movement and is paintable. Integrally waterproofed masonry requires that cracks larger than 0.02 inches be repaired for adequate resistance to wind-driven rain. The quality of crack preparation and sealant installation should be verified. The inspector should also confirm that sealant is not being used in areas of deficient mortar that should be tuckpointed.
JointsIf control joints are to be removed and replaced, the inspector should examine the quality of preparation and removal of the existing joints (photo 7), primer application (if required), backer rod installation (closed cell) and thickness of the sealant during the spot inspections.
Once the joint is in place, the only way to determine the quality of the work, including confirming that new sealant was not simply installed over existing sealant, is destructively (photo 8). Sealants used at the base of walls, at awnings and flashing and around penetrations should be examined for use of proper material, backer rod and primer if needed, and quality of installation. An alternative to cutting into the sealant to determine its thickness after the fact is to drill an eighth-inch-diameter hole through the sealant into the backer rod. The depth of the joint sealant can often be gauged by the resistance during drilling.
The inspector should also examine sealants for proper tooling (photo 9).
Surface Preparation for PaintingBefore any paint is applied, the inspector should examine the surface for the degree of cleaning. Cleaning requirements for repainting projects may range from removing chalk, loose coating and surface debris by pressure washing, to full coating removal. If total coating removal is required, the specification should clarify the expectations for coating removal. For example, does the removal of “all” coating mean that no visible traces of coating are allowed? Or does it mean essentially all traces of coating are removed, such as 95 percent, or some other amount? If a percentage such as 95 percent is required, the specification should stipulate whether it is 95 percent of each block unit or 95 percent of an entire section of wall. Do the slight traces of coating at the bottom of the porous block surface need to be removed? Since the interpretation of coating removal can be subjective, visual and physical acceptance criteria through the use of test patches should be established before the production work begins. If the visual and physical expectations for cleaning are not clarified in advance, opinions regarding acceptability are prone to dispute once the work is under way. Let’s assume that a specification requires the removal of essentially all coating from the mortar joints and blocks, defined as 95 percent of the coating on each block unit, therefore allowing slight traces to remain. Photo 10 shows two different levels of coating removal on the same wall. In the bottom left of the photo, the intermediate and finish coats have been removed with slight remnants of block filler remaining. In contrast, much more block filler remains on the rest of the wall. If the visual expectations regarding 95 percent coating removal are not clearly established before the production work begins, the inspector could interpret the cleaning in the bottom of the photo as representing 95 percent. On the other hand, the contractor could interpret the cleaning on the rest of the wall as representing 95 percent. The result is a dispute that disrupts the job.
Agreement on the visual expectations before the work begins eliminates this problem. A spot inspection should be scheduled when the test patches are prepared, as indicated earlier, and the first time that production cleaning work is performed. If blast cleaning or high-/ultra-high-pressure water-jetting is used as the method of preparation, the surface texture must be examined for acceptability. Again, a test patch obtained at the beginning of the project will allow the stakeholders to examine the roughness created by each of these methods. They can make changes to the cleaning process if the surface is too coarse. When the specification requires overcoating, the inspector should examine the adhesion of the existing coating with a knife to make sure it is adequate to support additional coats. Also, the thoroughness of washing and hand or power-tool cleaning should be examined for removal of loose coating, chalk and surface debris. Note that when the surface is wet from pressure washing, it typically appears to be clean, which can be misleading. The surface should be examined after the water dries to ensure the cleaning process was thorough and methodical (photo 11).
The inspector can easily, quickly determine removal of chalk by rubbing a cloth across the surface in accordance with ASTM D4214, Standard Test Methods for Evaluating the Degree of Chalking of Exterior Paint Films (photo 12). Obviously, once the paint is applied, the degree of cleaning can no longer be determined. The inspector must examine representative cleaning during a spot inspection while the work is in process.
Because the quality of cleaning is so critical to the long-term performance of the paint, whether applied to the bare substrate or to existing coating, one or more of the spot inspections should be scheduled while the production cleaning is under way. The inspector should not only examine the quality of cleaning, but he should also examine the collection of surface-preparation debris during cleaning for compliance with regulatory requirements (photo 13).
Moisture ContentPrior to painting, it is critical to examine the substrate for evidence of moisture, which if painted over, can lead to a mottled appearance, pinholing, blistering, peeling, wrinkling and improper film formation. Moisture may have previously entered the walls due to deficiencies such as leaking roofs or flashing, cracks in the block and mortar, separated sealants, air infiltration/exfiltration or existing coatings’ poor resistance to wind-driven rain. It could also have been injected into the wall from cleaning practices involving water. Regardless of the source, the wall should be examined for the presence of moisture prior to painting and, if present, be allowed to dry. Note that if in-fill insulation is retaining water, a building specialist should be contacted to discuss possible drying methods. While in some instances the presence of moisture can be identified visually at the time of application (photo 14), it often escapes detection under casual observation, only to be revealed when the paint exhibits distress, which may occur many months after application.
Moisture inspections should not be based on visual observations alone. In many cases, the surface can appear dry, when it is actually quite damp. One method of detecting moisture that is more discriminating than visual observation is the plastic sheet test, conducted in accordance with ASTM D4263, Standard Test Method for Indicating Moisture in Concrete by the Plastic Sheet Method. In this test, the perimeter of an approximately 18-inch-square (46-centimeter-square) plastic sheet is taped to the surface and allowed to remain overnight. The next morning the underside of the plastic and the surface beneath it are examined for moisture (photo 15). If present, additional drying is needed prior to painting.
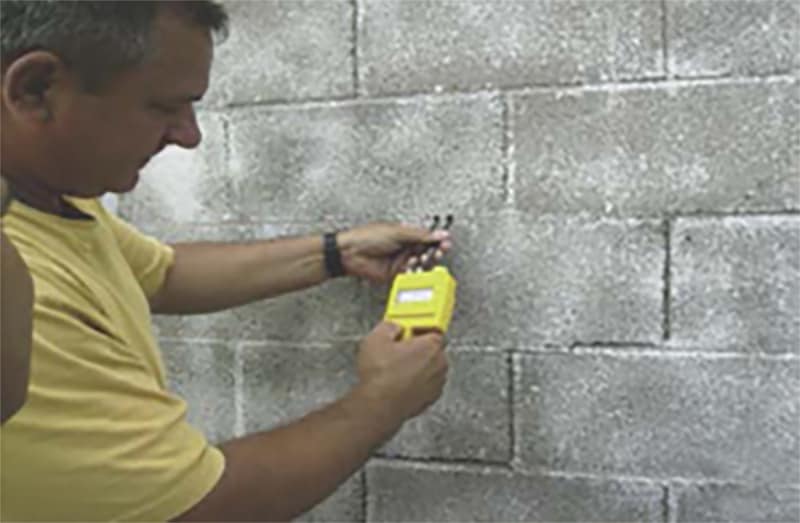
Moisture meters should also be used during spot inspections. Test results vary based on the different operating principles of the instruments. However, each type provides a number that indicates moisture content (typically on a relative basis). Regardless of the type of instrument used, all are capable of identifying unacceptable levels of moisture, both non-destructively and destructively (photo 16). Some will even identify the moisture content of the substrate through an existing paint film.
The inspector should examine wall interiors during spot inspections for evidence of moisture intrusion. Visible dampness indicates that the walls have been saturated with moisture during surface preparation or from other sources (photo 17). At a minimum, drying is required prior to painting. A detailed investigation may also be needed to find the cause in order to make appropriate building repairs. If the exterior coating is already applied at the time the interior moisture is seen, the inspector or contractor should thoroughly examine the recently applied paint film. They should also document the specific locations of the moisture for future paint performance evaluations.
Paint Mixing and ApplicationThe application of the paint calls for multiple inspections. The inspector should verify proper mixing of the coatings, especially two-component materials, and application of the correct products. For example, specifications often require the use of one coating type on cementitious walls and a different coating on adjacent downspouts, gutters and coping. Unfortunately, it is not uncommon for the wall coating to be applied to the adjacent metallic surfaces at the same time, in violation of the specification. Spot inspections during application will confirm that the specified coatings are applied to each of the surfaces. If there is a question after the fact, paint chips can be sent to a laboratory together with a sample of the specified material to determine if it was applied. But it’s much easier to avoid this concern by scheduling a spot inspection while the work is under way. The inspector should confirm as acceptable the ambient conditions of air temperature, surface temperature, relative humidity and dew point. The coating must also dry for the length of time stipulated by the manufacturer before being exposed to overnight dew or rain. Damp conditions can lead to poor film formation and wrinkling. If inspections are not conducted while the work is in process, the appearance of the paint should be examined for evidence of premature exposure to moisture (photo 18).
The inspector should confirm as acceptable the ambient conditions of air temperature, surface temperature, relative humidity and dew point. The coating must also dry for the length of time stipulated by the manufacturer before being exposed to overnight dew or rain. Damp conditions can lead to poor film formation and wrinkling. If inspections are not conducted while the work is in process, the appearance of the paint should be examined for evidence of premature exposure to moisture (photo 18). The inspector should observe the actual application for the use of methods and techniques that assure complete coverage. Spraying of block (photo 19) should be followed by back-rolling to assure that the surface irregularities in the block are completely sealed.
The frequency of pinholes should be examined for compliance with any restrictions imposed by the specification or coating manufacturer’s requirements (photo 20). Excessive pinholing can significantly reduce resistance to wind-driven rain.
The number of coats and the thickness of each should be confirmed while the work is in progress. The inspector can take measurements of wet film thickness (photo 21) during application to confirm that the correct amount of material is being applied. He can also calculate coverage rates to provide a theoretical indication that the correct amount of material has been applied, although it is not a guarantee that the proper thickness has been achieved in all locations.
Once dry, the total dry film thickness can be measured on cementitious surfaces using ultrasonic instruments, or on metallic substrates using magnetic gauges (for steel) or eddy current gauges (for non-ferrous metallic substrates). The only way to confirm the proper thickness of each coat in a multi-coat system after the fact is by destructive testing. Final Walk-down InspectionA final walk-down inspection should be conducted to visually verify coverage; freedom from runs, sags, drips, overspray and lap marks; that all of the specified work has been performed; and the aesthetics of the entire project. Final cleanup and removal of waste, cans of paint and all other construction materials should be confirmed. The final inspection should also verify that signs are replaced, outlet covers reinstalled and any other items that were removed to provide access to the surfaces are returned to their original condition. About the Authors
Kenneth A. Trimber, president of KTA-Tator Inc., is a NACE-certified coatings inspector level 3 and an SSPC-certified protective coatings specialist. Trimber has 40 years of experience in coatings inspection, testing and analysis, is a past president of the Society for Protective Coatings (SSPC), and is chairman of the SSPC committees on Surface Preparation, Visual Standards and Containment, along with the SSPC Commercial Coatings Committee (Architectural, Commercial, Institutional).
Kevin J. Brown is the commercial services group manager at KTA-Tator Inc., providing architectural/commercial clients with consulting and inspection services for all types of coatings as well as decorative concrete applications such as concrete polishing. Brown has more than 13 years of experience in the field of retail facility management, where he managed building-maintenance needs for more than 1,700 retail stores, with a concentration in building envelope and floor restoration. He is a registered roof observer, NACE coating inspector and a certified XL tribometrist. As seen in Durability & Design, February 2014 |