
Bare galvanizing provides excellent corrosion protection at a pH between 7 and 13, but corrosion of the zinc increases as the pH becomes more acidic (less than 7), or more alkaline (greater than 13). When galvanizing is exposed to the lower or higher pH ranges, it should be painted. Paint should also be applied when aesthetics is important, regardless of pH. Unfortunately, when galvanizing is painted, paint failures can occur (Photo 1), but they are easy to prevent through proper surface preparation.

Surface preparation is the key to assuring successful coating adhesion and performance. The extent of preparation required depends on the answers to these four questions:
- Was the galvanizing passivated?
- Is the galvanizing new?
- Is the galvanizing partially weathered?
- Is the galvanizing aged?
Passivating Treatments – Passivation is a common practice used at the time of galvanizing to reduce the formation of white storage stain. Unfortunately, passivating treatments applied to galvanizing (especially chromate treatments) can interfere with the adhesion of coatings. If the galvanized steel is going to be painted, the galvanizer should be notified in advance, so that the passivation step can be eliminated. Frequently, however, parts have already been galvanized and the user does not know whether a treatment was applied. When in doubt, the surface should be tested. A suitable procedure is provided in SSPC-SP16, Brush-Off Blast Cleaning of Coated and Uncoated Galvanized Steel, Stainless Steels, and Non-Ferrous Metals.” Section 4.3.3 of the standard offers the following:
The presence of chromates or other passivating treatments is detected by using a solution of copper sulfate, with the following procedure:
- Ensure that surfaces are free of any visible oxidation or oxidation by-products
- Prepare the solution by dissolving 2 grams of copper sulfate crystals in 100 ml of deionized water.
- Mark off three adjacent areas on the galvanized part, approximately 6.45 cm2 (1 inch2)
- Leave one area untouched, solvent wash the second and third areas, and also thoroughly sand the third area using emery paper.
- Using an eyedropper or pipette, saturate a cotton swab with the copper sulfate solution and apply to all three areas, or apply the solution directly to the three areas.
If all three areas turn black immediately, there is no passivation on the surface. If the first area does not turn black within 10 seconds and the second and third areas turn black immediately, there is no passivation on the surface with the possible exception of light oil. If the first and second areas do not turn black within 10 seconds and the third area turns immediately, a passivator of some type is present.
If it is present, mechanical cleaning is typically required to remove it, although some of the etching/cleaning solutions discussed below suggest that they will also remove some treatments. Before using them, it is recommended that the etching cleaner be applied to discrete areas followed by the testing described above to determine if the treatment is removed. If the project schedule permits, weathering of 12 to 18 months prior to painting, should also eliminate any treatment that may have been present.
New and Partially Weathered Galvanizing – If the age of the galvanizing is less than approximately 48 hours, it may be possible to coat it as is, but if it is weathered between a couple days and approximately one year (termed partially weathered), surface preparation will be required. Two methods that are commonly used to prepare the galvanizing are cleaning/etching with a phosphoric acid/detergent blend and abrasive blast cleaning.
Etching solutions are used to clean, dull, and roughen the surface for proper coating adhesion. The solution is applied to the surface, typically scrubbed with a synthetic abrasive pad, thoroughly rinsed, and force dried. Examples of solutions can be found in the Master Painters Institute (MPI) qualified products list #25, Cleaner, Etching, for Galvanized Metal (http://www.specifypaint.com/APL/paintinfo_APL_new/MpiNumber.asp?ID=25000).
Abrasive blast cleaning is performed according to SSPC-SP16. Excerpts from a few paragraphs of the standard describing the cleaning of bare, uncoated metal (galvanizing) are repeated below. The sentences that were redacted address the criteria for any paint remaining on the surface, which is not applicable to this article.
2.1 A brush-off blast cleaned non-ferrous metal surface, when viewed without magnification, shall be free of all visible oil, grease, dirt, dust, metal oxides (corrosion products), and other foreign matter… Bare metal substrates shall have a minimum profile of 19 micrometers (0.75 mil).
2.1.1 The entire surface shall be subjected to the abrasive blast to achieve the specified degree of cleaning and to produce a dense and uniform surface profile on the bare metal substrate. The peaks and valleys on the surface shall form a continuous pattern, leaving no smooth, unprofiled areas…
2.1.2 …If the surface profile is not specified in the procurement documents, the abrasive selected shall roughen the cleaned surface to the degree required by the product data sheet for the coating to be applied.
Paragraph 4.3.1 of the standard requires the removal of wet storage stain by means other than blast cleaning since the “dwell time” required to remove it by blast cleaning can damage the galvanizing. Other methods are addressed in a non-mandatory Appendix. Appendix Section A3 indicates that salts from wet storage stain can be removed with a nylon brush and water, or a dilute solution of acetic or citric acid, lime juice, or white vinegar, followed by rinsing with a large amount of water.
Appendix Section A8.1 indicates that to reduce the risk of damage, blast cleaning is done with relatively low nozzle pressures (A8.2) and a softer abrasive with a Mohs hardness of 5 or less (A8.1.1.).
Appendix Section A9 recommends that the thickness of the galvanizing be measured before blast cleaning and again after blast cleaning to confirm that it meets the specified thickness. The thickness requirements may be found in the procurement documents, or as required in ASTM A123, Standard Specification for Zinc (Hot-Dip Galvanized) Coatings on Iron and Steel Products, or ASTM A153/153M, Specification for Zinc Coating (Hot-Dip) on Iron and Steel Hardware.
The Appendix (A9.2) cautions that in the presence of moisture, zinc oxides can form quickly on the surface after preparation, so it should remain dry, and painted as soon as possible. The same recommendations for a minimum 5°F (3°C) spread between surface temperature and dew point temperature when preparing steel (steel temperature being the higher of the two), also apply to galvanizing.
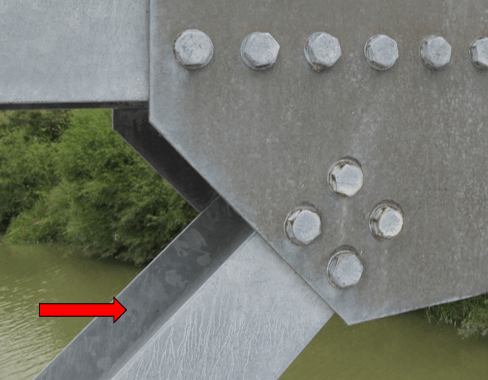
Aged Galvanizing – When galvanizing has weathered for 12 to 18 months, the surface will have oxidized and can often be prepared for painting by pressure washing alone. The key is to remove surface dirt and debris as well as zinc salts and confirm that the surface is dull (photo 2).
Depending on the condition of the steel, 3,000 psi with a rotating tip may be adequate, but it’s best to apply a test patch of the coating after cleaning and check the adhesion to make certain. If there is any doubt regarding the adhesion of the coating, either of the methods described above for partially weathered galvanizing (etching cleaner or SP-16 Brush-Off Blast) should be used.
Conclusion – Most coating failures on galvanizing are the result of poor adhesion of the coating to the galvanizing. Poor adhesion is typically caused by a lack of roughening of the smooth galvanizing, an abundance of zinc salts beneath the coating film, or the presence of a passivating treatment that inhibits adhesion of the coating. When properly prepared, coatings will adhere well to galvanizing and improve the aesthetics and corrosion protection afforded by the galvanizing. This article described a few common methods or preparing galvanizing for painting. Other methods are described in:
- ASTM D6386, Standard Practice for Preparation of Zinc (Hot-Dip Galvanized) Coated Iron and Steel Product and Hardware Surfaces for Painting
- ASTM D7396, Standard Guide for Preparation of New, Continuous Zinc-Coated (Galvanized Steel Surfaces for Painting

Ken Trimber, thanks a lot for the article post.Much thanks again. Fantastic.
Ken Trimber, thank you for your blog post.Really thank you! Awesome.