
Changes to Surface Profile Measurement using Testex® Replica Tape
Profile Measurement using Testex® Replica Tape
KTA’s Certified Coating Inspector Forum
Volume 4, Issue No. 6 – December 2025
William Corbett, Technical Consultant
AMPP Senior Certified Coating Inspector & Certified Protective Coating Specialist
KTA’s Certified Coating Inspector Forum is designed to provide professional development/continuing education on standards, inspection practices, new instruments, and other topics to help keep certified AMPP and FROSIO coating inspectors current. It represents the views of the author and KTA-Tator, Inc. It may or may not represent the views of AMPP: The Association for Materials Protection & Performance, even though SSPC, NACE, and AMPP standards are frequently referenced in the content.
Introduction
Testex Corporation was acquired by DeFelsko Corporation (manufacturers of the PosiTector and PosiTest line of inspection instruments) in 2023. Over the past year or two DeFelsko has made some changes to how the replica tape is packaged and used, developed a special burnishing tool, introduced a digital micrometer, and eliminated the need to use both Coarse and X-Coarse Tape in the “overlap range” of 1.5-2.5 mils. This article describes the updated procedures for measuring surface profile using replica tape.
Changes to the Replica Tape Appearance/Packaging
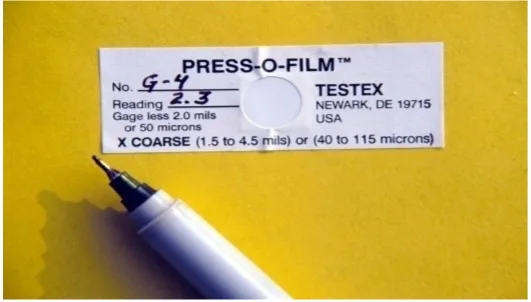
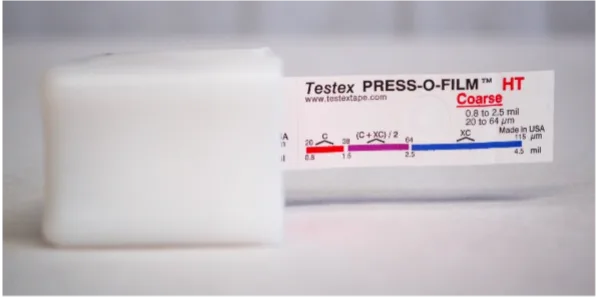
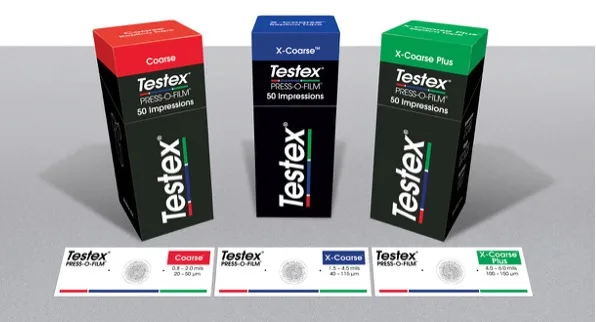
Testex replica tape has always consisted of a 2-mil polyester film (Mylar®) with a compressible foam layer on the underside; however, the appearance and packaging have evolved over the years (see Figures 1, 2, and 3). Replica tape is still available in the legacy plastic dispensers (Figure 2), but the intent is to eventually eliminate the plastic and supply the tape only in the small cardboard containers (containing 50 individual pieces of replica tape) shown in Figure 3.
Changes to the Micrometers and Measuring Process
There are different micrometers that can be used to measure the impression created in the replica tape, including the legacy analog micrometer, a digital micrometer, and a replica tape reader (RTR). A slightly different procedure is employed depending on which type of micrometer is used. The information below is based on the use of analog micrometers used by most KTA inspectors.
Analog Micrometer:
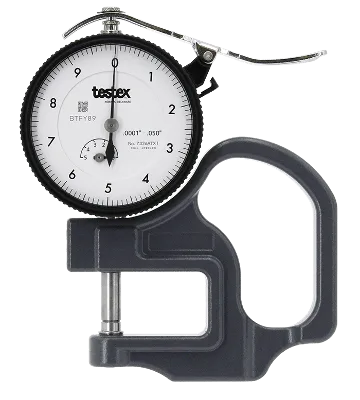
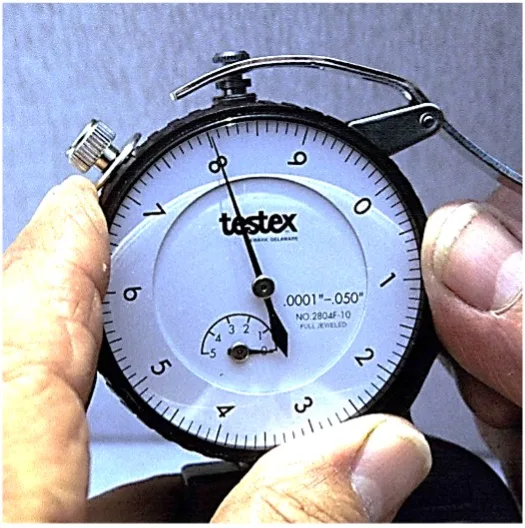
(1) Preset the micrometer to “8” on the dial, which effectively pre-deducts 2 mils for the Mylar® thickness (Figure 4).
(2) Insert the replica tape between the anvils, release the lever, and read the surface profile from the dial.
(3) Convert the reading using the Analog Micrometer Conversion Table (Figure 6).
(4) Record the converted value.
(5) Obtain a second reading and average the two readings to produce a measurement.
By converting the micrometer reading using the Analog Micrometer Conversion Table, there is no longer a need to use both Coarse and X-Coarse replica tape when the measured surface profile lands between 1.5 mils and 2.5 mils, which is the overlap between the Coarse and X-Coarse measuring ranges, as illustrated by the red circle in Figure 5.
The Analog Micrometer Conversion Table and Quick Guide are now supplied with the Testex Replica Tape.

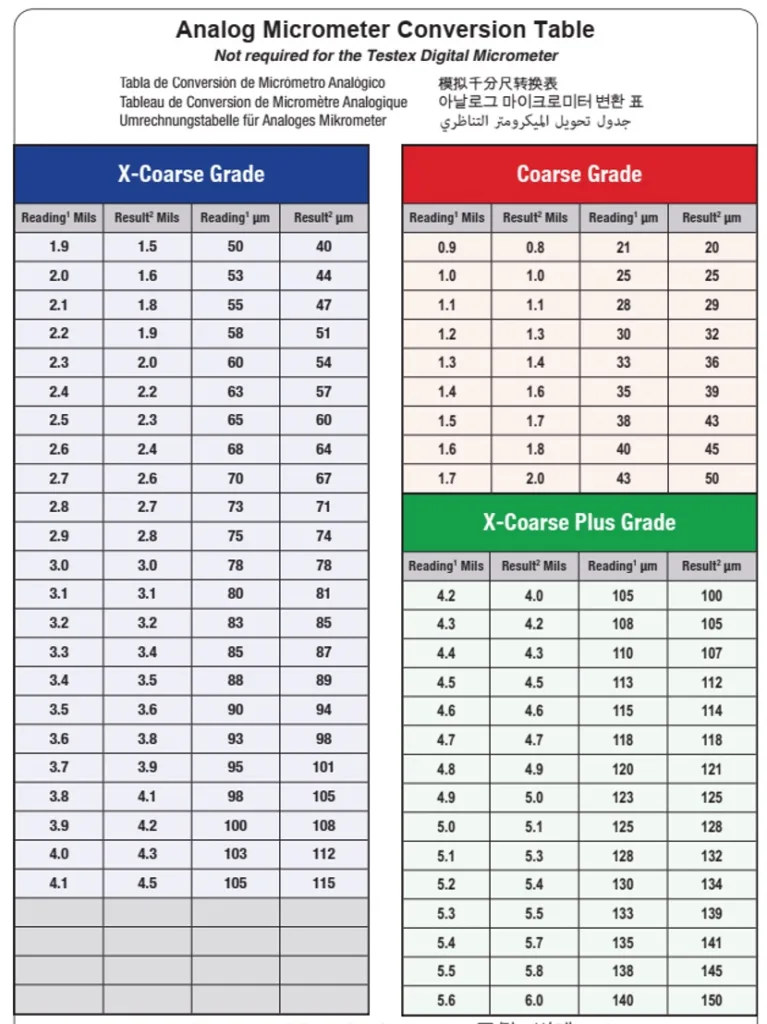
For example, if X-Coarse grade tape was used and the analog micrometer reading was 3.9 mils, the actual surface profile is 4.2 mils. Independent of the stated range for each tape, if your reading with the Coarse tape is between 1.8 and 2 mils, it is recommended to use the X-Coarse tape. Similarly, if your reading with the X-Coarse tape is between 4.2 and 4.5 mils, it is recommended to use the X-Coarse+ tape. The replica tape is most accurate mid-range.
Frequency Asked Questions (FAQs)
1. Readings taken with legacy Testex Tape shown in Figure 2 (with the red/purple/blue scale on each piece showing the overlap) and an analog micrometer can be “corrected” using the Conversion Chart, or by taking readings with both C and XC tape, then averaging the two readings if both readings are between 1.5 and 2.5 mils. If the averaging method is used, then no further “conversion” is required. Is this correct?
Correct. Whether using legacy or new tape, if you are using the Averaging method, the overlap range where you must take a reading with both tapes is 1.5 to 2.5 mils. No further conversion is needed once averaged.
2. Readings taken with new Testex Tape shown in Figure 3 and an analog micrometer can be “corrected” using the Conversion Chart, or by taking readings with both C and XC tape when the two readings are between 1.5 and 2.0 mils (since the range of the Coarse replica tape changed from a maximum of 2.5 mils to 2.0 mils). If the averaging method is used then no further “conversion” is required. Is this correct?
Incorrect. Because the new tape is physically identical to the legacy tape, inspectors using the “Averaging” method must continue to use the 1.5 to 2.5 mil overlap range. They cannot rely on the 0.8 to 2.0 mil range printed on the new packaging, as those numbers specifically apply to the Conversion method. If an inspector chooses to average, the old overlap rules/ranges apply.
3. Even though the legacy Coarse replica tape range is stated as 0.8-2.5 mils, the true range is 0.8-2.0 mils. Is this correct?
Actually, the “true” range depends entirely on the measurement method being used. When using the “Averaging” method, the Coarse tape’s usable range extends to 2.5 mils (with averaging required between 1.5 and 2.5). When using the Conversion Chart method, the Coarse tape is used up to 2.0 mils, and X-Coarse takes over for readings above 2.0 mils.
4. When the “C + XC/2” averaging method is used, 4 readings must be taken to obtain two actual readings to satisfy “duplicate readings” required by ASTM D4417. Is this correct?
Incorrect. Only two pieces of tape are needed for the old averaging method, one of each grade. While this was never 100% clear in the legacy instructions, it appears to have always been the intent that a single averaged pair (one Coarse and one X-Coarse) satisfies the requirement.