Introduction – Surface preparation is the key step in assuring the performance of coatings applied to any substrate and wood is no exception. It is often assumed that washing is good enough, but the preparation of both painted and unpainted wooden substrates for painting can be as involved as preparing concrete or steel.
Preparation of Wood for Painting – Wooden substrates need to be repaired and properly cleaned before applying treatments or coatings. The following is a review of typical repair and cleaning issues.
Wood Rot Caused by Bacteria, Fungi, and Insects
Wood rot is a natural process that is essential to nature because it creates fertilized soil. Nevertheless, when the wood is used for construction, rot must be prevented, or if already present, repaired. Like corrosion of steel, if it is left unchecked, rot will destroy the structural integrity of the wood and the elements will need to be replaced.
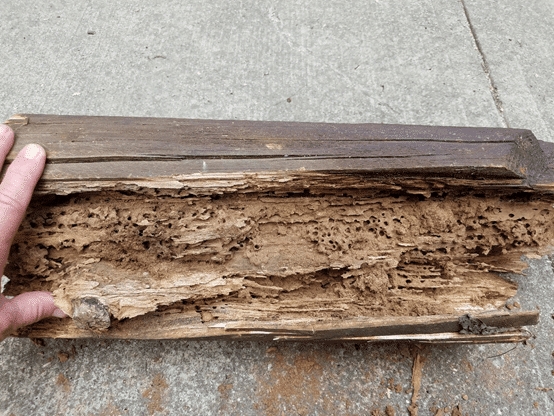
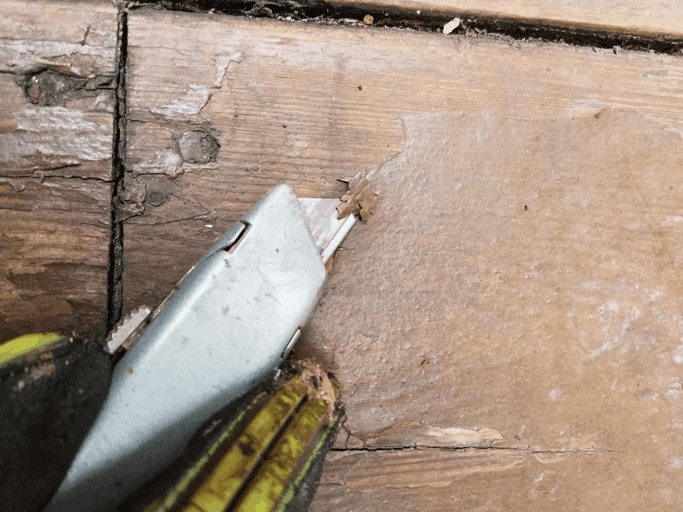
When ideal conditions of moisture, food, oxygen, and a warm environment are present; bacteria or fungi grow and decay the wood. Fungi leave spores behind which allows for decay to continue. Wood boring insects and termites can cause even greater damage, creating hollow porous tunnels and openings within the wood (Photos 1 and 2).

When the wood is to be painted, if the element is salvageable, the damaged wood must first be removed. This is commonly accomplished with hand tools such as a hammer and chisel or router. Since spores will remain, the best way to mitigate future damage is to inhibit their exposure to growth conditions. This can be achieved by applying a fungicide over both the good and damaged wood. Fungicides are often derived from borates such as disodium octaborate tetrahydrate powder. In addition to encapsulating the spores and blocking moisture, they can also serve as insecticides.
Once the spores and damaged wood have been removed, the areas can be filled or cut out. When cut out, a new piece of wood can be cut to shape and glued or screwed into the opening. For filling, different products are available depending on the end use of the wood. Oil-based wood putty is often used on exterior wood. The oil makes the putty water resistant and flexible, helping to prevent it from washing away and breaking down when the wood around it swells and shrinks. Another common product is wood filler. When wood is unfinished, wood filler is a popular choice because it can be sanded.
After the wood filler or putty has dried, subsequent preparation of the wood can continue as normal.
Ultraviolet Light Degradation
Polymers in the wood such as cellulose and lignin are depolymerized by the ultraviolet (UV) light radiation. Water in the degraded areas is pulled away creating discoloration of the wood. Once degradation takes place, it is irreversible. The layers of wood that have been penetrated and damaged by the ultraviolet radiation must be removed, often by sanding. Once the top layers are removed, the sound wood can be cleaned for painting.
To prevent further UV degradation of exterior wood, stains and coatings can be applied as discussed in Topic 2 of this series. If the wood is in an interior environment, awnings, curtains, and window shades can be used to limit the amount of sunlight exposure. Additionally, films can be applied to windows or windows replaced with low emissivity windows that are designed to reduce the amount of ultraviolet light that penetrates them. But even with these measures, some discoloration of the wood may occur.
Loose, Deteriorated Paint
The process of removing loose paint can vary greatly in time and effort. The first step it to establish the definition of “loose.” How much adhesion does the existing paint need to remain?
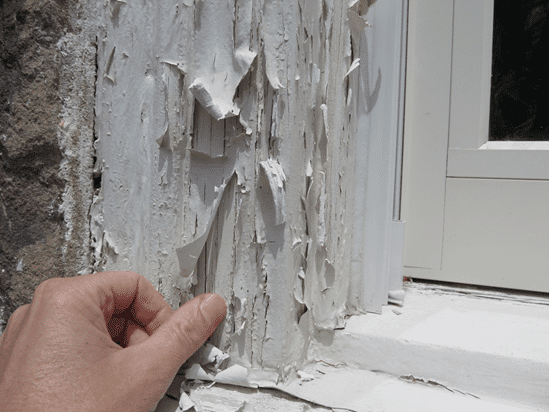
A suitable method for testing the adhesion is by knife cutting and probing in accordance with ASTM D6677, Standard Test Method for Evaluating Adhesion by Knife. An “X” is cut into the coating and the apex probed with a knife. The relative effort required to remove the coating is rated. Another method, ASTM 3359, Standard Test Method for Measuring Adhesion by Tape Test, is designed for coatings on metal substrates, but the standard acknowledges that it has been used on softer substrates such as wood. It involves cutting an “X” or lattice pattern into the coating, applying a pressure sensitive tape to the surface, removing the tape sharply, and determining the amount of coating that remains intact. A variation of this test for coatings on wood is found in ISO 2409, Paints and varnishes – Cross-cut test. It involves cutting a lattice pattern (cross-cut pattern) into the coating and evaluating the amount that is removed by virtue of the cutting. The tape is not used. Knife probing the edge of lifted areas without cutting an “X” or lattice pattern can also be done. It is an effective means for determining to perimeter of areas of poor adhesion (Photo 3).
Unless the manufacturer of the new coating can provide acceptance criteria for the testing, it is helpful to prepare test patches to determine how much of the existing coating needs to be removed. Methods of preparation should be selected to provide a range of coating removal from very little (low pressure washing) to a lot (power sanding). The new coating or stain is then applied to each method of preparation. The coating in the test areas should be allowed to dry for as long as possible, but preferably at least one month. After that time, the adhesion can be assessed, and a decision made as to the type of cleaning that should be performed and the amount of existing coating that can be tolerated (Photo 4).
In some cases, washing and scrubbing with soap and water may be enough to remove the loose paint and surface contaminants. In other cases, pressure washing, including detergents, may be needed. When pressure washing is used, care must be exercised to avoid damaging and saturating the wood with water. Ample time must also be allowed for thorough drying before painting.
When water is not enough, mechanical means of preparation are required in addition. The simplest are hand and power tools. One of the most effective hand tools is a pull scraper that consists of a blade and a handle. The blade needs to be sharp and thick enough to make it rigid and mounted at an angle for scrapping. A longer handle is also desirable as this allows for increased leverage. Downward pressure is applied to the blade to keep it from lifting from the wood. While maintaining the pressure, the tool is pulled back across the surface to remove the loose coating. Other common hand tools include putty knives and wire brushes.
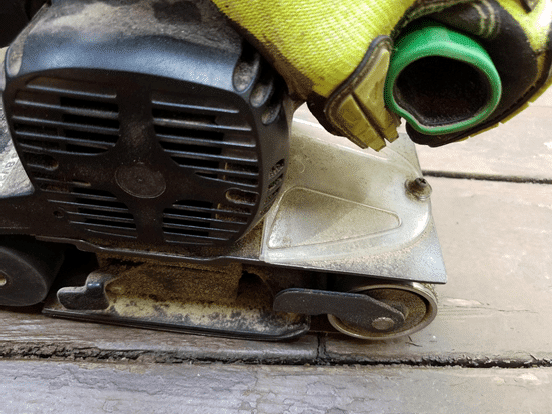
Sanding can also be used to remove loose paint, just as it is used to remove UV degraded layers. Sanding can be done with both hand tools and power tools (Photo 5).
If toxic metals such as lead are not present, another method of removing paint is by heating and “melting.” Heat guns, similar in appearance to hair dryers are used to heat sections of paint. As the paint becomes hotter, it begins to bubble and lose some of its adhesive strength. When this occurs, the paint can be scrapped from the surface. This method is “all or none,” though. That is, once the heat is applied, the entire coat in that area must be removed, which includes paint that may have been classified as “tight.”
Another “all or none” method involves the use of chemical strippers. Chemical strippers can be used for essentially all coatings but are often used when dealing with lead paint as sanding and heat guns create potential health and safety problems. The stripper is applied to the surface and allowed to remain in place for 15 to 20 minutes or longer to disrupt the bond of the paint. The loosened paint is scraped and/or washed from the surface. When many coats are present, multiple applications of the stripper may be needed. When strippers are used, thorough rinsing is needed to remove all traces of the stripper so the new coating is not damaged, and long drying times before painting must be allowed for the moisture in the wood to evaporate.
Oftentimes, combinations of several of the above methods are used to remove some or all of the existing coating.
Biological Growth (Mold and Mildew)
Biological growth such as mold and mildew grow best in areas that are moist and warm. They can cause major problems for wood as they are types of fungi that can lead to would rot as described earlier. If either are present, they must be treated prior to applying a coating. A proven method of removing mold and mildew is by applying a bleach solution to the surface. A viable mix ratio is one cup of bleach and 15 cups of water to make 1 gallon of solution. Increasing the amount of bleach will make a stronger solution but as a general rule of thumb, the solution should not contain more than 25% bleach (e.g., 1 part bleach to 3 parts of water). Rubber gloves should be used to protect the skin during application. A stiff bristled brush, sponge or wash cloth should be dipped into the bleach solution and the affected area scrubbed. After a dwell time of approximately 10 minutes and when the mold/mildew is no longer visible, the surface should be rinsed with clean water and allowed to dry thoroughly before painting to prevent further fungal growth. Commercially available antimicrobial treatments can also be applied to prevent the mold from returning.
Surface Contamination
Surface contaminants such as dirt, dust, grease, and oil can interfere with the adhesion of subsequently applied coatings. It is critical that the surface be clean prior to painting. Methods of cleaning can be placed into two categories: physical treatment and chemical treatment. Physical treatment is often hand and power sanding to remove surface contaminants. Because sanding creates a significant amount of dust, the dust must be removed before painting. This can be accomplished by washing with water, using a vacuum, or brushing with a clean brush. Gloves should be worn while sanding both for personal safety, but also for the quality of cleaning because oils found on skin can contaminate the wood.
Chemical cleaning includes the removal of contaminants with cleansers and soaps. Because the tolerance of the wood to different types of cleaning agents, it is important to read the labels to confirm that the material is acceptable for the wood species being cleaned. When using chemicals and cleaners, it is also important to make certain that no residues are left on the surface prior to painting. Depending on the type of chemical used, tests like pH may provide an indication whether residues remain. Knowing which cleansers pair well with the wood and the coating being applied will help to provide a desirable finish.
Conclusion – Proper preparation of wood to receive coatings is critical to long-term performance, especially for wood that has been exposed to ultraviolet light and weathering, whether bare or previously painted. If degraded wood and deteriorated coatings are not removed, and the surface not adequately cleaned, the performance of newly applied treatments or coatings will be compromised.
The topics in this wood series:
Topic 1 – Preparation of wood for painting
Topic 2 – Coatings and preservatives for wood
Topic 3– Inspection of cleaning and painting
About the Author

Anton Martinez is a Project Engineer with KTA-Tator, Inc. He holds a BS in Civil Engineering from the University of Akron and is a NACE Level 1 Certified Coatings Inspector. Anton can be reached at amartinez@kta.com